Pages

Followers

Thursday, August 22, 2019

ENTRY 5 BANNER MAKER APPS

APPS

2.  FOTOR             
  • How to Start A Design
Fotor provides dozens of design dimensions for templates ranging over a wide variety of occasions. Just click “Design” to get started.Select the template you want or choose Custom Size to start your design.
  •  Search Templates
 Click “Find Templates” on the lower left side of the screen. The Explore Templates page will be displayed and you can enter the keyword(s) for the template you’re searching for in the Search.
  • Text
Click the “Text” icon on the left hand navigation, then click on the heading your require, and the text is added to your template where you can manipulate it.Select the text, click the Color Palette, click on the color of your choice, and the text is rendered in the new color. Alternatively, you can use the color picker, or enter a color value to to modify the text color directly.Select the text you want to change, click the Font drop-down menu and select your desired font.
  • Stickers
Fotor provides you with a range of Stickers that include: Image ShapeBasic ShapesLinesIllustrations, and Icons. You can also Search for additional stickers in accordance with your needs.You also have the option to upload your own stickers and use them. Click on Use Your Own and follow the instructions to upload your stickers. They will be stored in your Fotor Cloud album synchronously.
  •  Background
Click the Background feature on the left hand navigation. You can change the background to a color of your choosing by clicking any color in the panel.You can set an image as the background.You can set the background image to a texture provided by Fotor by clicking any of the images. If you wish to use a background of your own click Use Your Own. Your images located in the Fotor Cloud are displayed. Hover the mouse over the image you require and a hamburger menu appears in the top right corner of your image. Click on the hamburger menu and select Set As Background. Your image will now be displayed as the background. The images uploaded will be saved in the Fotor Cloud album synchronously.
  • How to Resize Template


  1. Click the “resize” button in the menu bar below the page to select your desired size, or specify the size you require using Custom size.


ENTRY 4 BANNER EDITOR SOFTWARE

SOFTWARE

1. PICMONKEY
  •  Start with a blank  photo
If you want to start with a photo as your background instead, start on the PicMonkey homepage, click Create New in the upper left corner and select your photo from where it’s stored. Convert your photo from a background to a layer using the Layers palette (the stack of squares icon on the bottom left) first. Go to Crop in the Basic Edits tab, enter the dimensions of your banner, and click Apply.
  • Design with graphics

 To add one to your pic or canvas, click the Graphics tab (the three shapes icon) and peruse our  selection of graphics. Once you find a graphic you like, click to add it to your banner.Click Add your own image at the top of the panel, choose your image from where it’s stored and boom! Custom graphic added.
  • Export your banner to your computer

Click Export to save your banner on your computer. It’s already saved in PicMonkey because files save to Hub automatically as your work. Hub is our cloud-based storage system, and the wonderfully useful thing about it is that your saved image remains layered, and therefore editable and that means you can modifi

ENTRY 3 POSTER MAKER SOFTWARE

SOFTWARE

1. PHOTOSHOP                

  • Create new document  
This will open a New File window where you can select all the properties of your banner. Select size (we chose 8ftx2ft) and resolution (in this case, 120 pixel/inch is enough given that this banner will be seen from a distance of approximately 10ft). The further away the viewer will stand, the lower the resolution can be. That’s the mode used for printing and background contents is set to white for a white background.
  • Insert an image       
A Place window will open. Select an image of your choice and click Place.The picture you selected will appear on your banner like this.To move the picture simply click and drag. To re-size it hover over one of the corners of it until the cursor appears as a double sided arrow. Tip - Hold shift and drag to re-size proportionally.By repeating the process you can add as many images as you like. Here we added the logo.
  • Adding text
Click anywhere to on the banner to start typing.Once you’re done confirm the action the same way you did with placing images.To move text around select the layer it’s on (on your right side) and the move tool from the left hand side menu, then click and drag.You can resize text the same way you resized pictures (Edit>Free Transform) and move it around using Move Tool.
  • Changing background colour   

Select the paint bucket tool from the left hand side menu and the background layer. Pick the colour either from swatches or the colour mixer.Simply click on the banner to change the colour of the background.

  • Saving the file    
A Save As window will open. Save the file in Photoshop format first, so you can make any changes to it in the future.Then go to layer - flatten image and repeat the process (File>Save As...) and save it in the Photoshop PDF format. This is the file you’ll deliver to your printer. Click Save.A new Save Adobe PDF window will open. Make sure you select High Quality Print as a Preset.


ENTRY 2 RESIZE TEMPLATE BANNER APPS

APPS

2.  FOTOR             
  • How to Start A Design
Fotor provides dozens of design dimensions for templates ranging over a wide variety of occasions. Just click “Design” to get started.Select the template you want or choose Custom Size to start your design.
  •  Search Templates
 Click “Find Templates” on the lower left side of the screen. The Explore Templates page will be displayed and you can enter the keyword(s) for the template you’re searching for in the Search.
  • Text
Click the “Text” icon on the left hand navigation, then click on the heading your require, and the text is added to your template where you can manipulate it.Select the text, click the Color Palette, click on the color of your choice, and the text is rendered in the new color. Alternatively, you can use the color picker, or enter a color value to to modify the text color directly.Select the text you want to change, click the Font drop-down menu and select your desired font.
  • Stickers
Fotor provides you with a range of Stickers that include: Image ShapeBasic ShapesLinesIllustrations, and Icons. You can also Search for additional stickers in accordance with your needs.You also have the option to upload your own stickers and use them. Click on Use Your Own and follow the instructions to upload your stickers. They will be stored in your Fotor Cloud album synchronously.
  •  Background
Click the Background feature on the left hand navigation. You can change the background to a color of your choosing by clicking any color in the panel.You can set an image as the background.You can set the background image to a texture provided by Fotor by clicking any of the images. If you wish to use a background of your own click Use Your Own. Your images located in the Fotor Cloud are displayed. Hover the mouse over the image you require and a hamburger menu appears in the top right corner of your image. Click on the hamburger menu and select Set As Background. Your image will now be displayed as the background. The images uploaded will be saved in the Fotor Cloud album synchronously.
  • How to Resize Template
  1. Click the “resize” button in the menu bar below the page to select your desired size, or specify the size you require using Custom size.


ENTRY 1 POSTER AND BANNER APPS

 Apps

1.  Canva             
  • Browse the templates library to find and create the right content.
The templates page is arranged into categories -- types of content -- and subcategories for themes or topics.
         
  • Find the right visuals to go with your post using Canva built-in photo library.

The extensive photo library hosts a wide variety of subjects and themes, like abstract images, textures, landscapes, people, and animals. Once you’ve found the perfect image, just drag it over to your design, and drop it where it needs to go. Canva also allows you to upload your own images and use them on your design, which is perfect for adding your logo and other branded visuals to content.

  • Marry image and text through typography.
we're already working with a template, we can just edit the placeholder text and add in the right details.Making sure your font complements the rest of the visual content can be tricky.

  • Enhance your image with a filter.
To add a filter, select your image, click on the filter button, then choose from any of the 14 custom filters available in Canva. Use the slider to control the intensity of the filter.
  • Resize your whole design to fit various platforms.

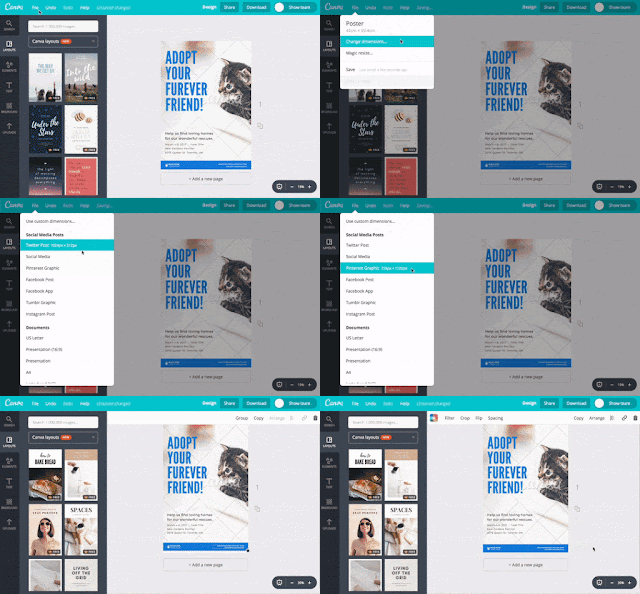
Magic Resize is quite a time-saving feature that lets you copy and resize one design into formats for various channels. Just click on "File," navigate to "Magic Resize," then choose the different formats you want to use to adapt your visual. Then, click the "resize" button, and you’re done.

Wednesday, August 21, 2019

BITETABLE

Hai good morning,  I'm back. In this beautiful morning. I will share about video maker by biteable.


1. Firstly click the biteable website

2.Then click the sign up.

3. Then click the make a video it's free

4. After that choose the template

5.  You can choose the scene 


6.Then you want to choose the colour of background.

7.Then you can write the text.

8.Then you can adjust the duration of video  for that click the timeline.

9.lastly you can add the audio.

10.After you can the video.


This is my example video 

Thursday, August 8, 2019

storyboard

Hai to everyone, i will share about my experience about doing video.
First one writing script and create storyboard.
In script want add the time , roles, and dialog.

Thursday, August 1, 2019

GADJET EXPERIENCE

HAI EVERYONE ....


 Today i will share about  how to add widgets clock , songs, follow, blog archive  and chat box 


1.CLOCK 

- Go to clocklink website.
- Choose your design.
-Accept the term 
-choose your country or city , timezone and colour.
-Go to your blog dashboard 
- Copy the link from your clock and paste it your gadjet.
-make sure it save.


2. songs 

- Go to your playlist.me or soundcloud website 
- search the your favourite song 
-click the embed 
- copy the link 
-then open your dashboard at layout , add gadjets at HTML/JAWA SCRIPT 


3.Followers 

- open your dashboard 
-go to layout 
- click on the add gadjet
-Scroll down and you will find the followers 
- click on the + icon then save it 


4.Blog archive 

- open your dashboard 
- Go to layout 
- click on the Add gadjet 
-Scroll down and you will find 'blog archive'
-click on the + icon then save it 


5. chat box 
-Google www.cbox.ws
-fill in your email
-create your CBox name and choose your chat colour 
-Then click on create my box and choose the free on 
- lastly choose your theme and save it .